
as many of you, with & without babies, know – babies drool & spit up. a lot. from a pretty early age kiddos are drooling for a variety of reasons, but what mamas notice is that onesies & shirts get really wet & it isn’t practical to change baby’s clothes multiple times a day for drool. some bibs do the trick, but at least for eloise, they are so large that its looks obnoxious & is just way too much fabric. luckily, I wasn’t the only one who thought a bandana would be the perfect solution & I was able to find lots of patterns & tutorials on pinterest.
{via White & Bright blog}
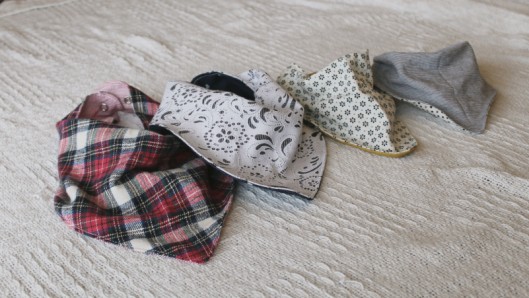
I ended up liking the look of the bandanas from the tutorial linked above, but the first set based on the original pattern were pretty big. for the next round I shrunk the entire pattern by an inch & think it’s a better size for eloise right now. {the finished sizes: original – 10” L & 7” W; shrunken – 9” L & 5.5” W}

{the original pattern on top & the shrunken pattern below}
supplies:
-
fabric – I used flannel, cotton, & terry cloth {you don’t need much more than a Fat Quarter!}
-
thread
-
fabric scissors {I have one set of scissors I only use for fabric & it makes a huge difference!}
-
pins
-
fasteners {I used sew-on snaps}
first wash & dry {& iron if needed} your fabric, especially if you are using two different types of fabric for one bandana {like I used terry cloth on the back with cotton or flannel on the front}.

then cut out your front & back pieces based on the pattern.
next pin your front & back pieces together. if there is a “right” side to the fabric, make sure it is facing in. I found the pinning to be the trickiest part since the two pieces aren’t identical. I started down at the bottom tip of the bib & moved up the sides. 

then I pinned the middle of the top of the bandana, and then pleated {two or three} the fabric. my advice is to just use lots of pins!


sew around the edges of the bandana leaving a couple of inches to turn it right-side-out. once it is right-side-out you can press the seams {this is optional but it helps with the next step}. then top stich around the entire bandana.


last add the snaps {or fasteners of your choice}. if you do use the sew-on kind, make sure you have the snaps facing in the right direction before you sew them on: the bottom snap piece will be on the top of the bandana end & the top snap piece will be on the bottom of the bandana end {see picture}. optional: you could also add another snap piece to make the bandana adjustable.


& you are done! fasten it on that little babe of yours & admire your handy work!


{it was fun to make all different bandanas. the bottom picture shows the fabric on the bottom side of the bib – a fun pop of pattern!}
these last pictures show the difference in the two bibs – the original versus the shrunken. the first picture of eloise is the shrunken version & the second is of her in the original.


what have you been sewing lately?
M